
Home » Troubleshooting » Chrysler Voyager heater not working – causes and diagnosis

Chrysler Voyager heater not working – causes and diagnosis
The heater in Chrysler Voyager ensures comfortable temperature in the passenger compartment when the weather is chilly. There are many reasons for poor heating performance in Voyager, which are explained in this article.

The heater may stop working in Chrysler Voyager due to low coolant level or air in the cooling system, clogged heater core, bad thermostat, faulty blend door actuator, bad water pump, dirty cabin air filter, bad blower motor, or HVAC control unit malfunction.
1. Low coolant or air in the cooling system
Low coolant level or air in the cooling system can cause the heater to stop working properly in Voyager. If the cooling system is not full and bled properly, the water pump will not be able to push the coolant around the system efficiently.
The heating system in Voyager uses hot coolant or antifreeze from the engine block to heat the interior of the vehicle. The hot coolant is pumped through the heater core located behind the dashboard. When you turn on the heating, air gets blown through the heater core, warming the air in the cabin. If there is air trapped inside the heater core, the coolant will not be able to flow through it properly. Since the heater core is usually slightly higher, the air will accumulate in there first. By filling and properly bleeding the system the heat should come back.
Sloshing water sound
Low coolant level or air in the heater core can sometimes cause sloshing sound from behind the dashboard when the engine is running. The sound is most prominent right after you start the vehicle.
Check coolant level
Checking coolant level in Voyager is a fairly some job. You just have to locate the coolant overflow reservoir and inspect the level of coolant in it. If the coolant level is low, open the cap and pour some coolant into the tank until it is between minimum and maximum mark.
Recommended video
2. Clogged heater core
Clogged heater core is one of the leading causes of heating not working in Chrysler Voyager. The design of the heater core is similar to the radiator, it has narrow internal channels through which hot coolant flows. Over time, the heater core can begin to rust or mineral deposits can form in these channels, blocking the flow of the coolant.
How to check if the heater core is clogged
You don’t have to remove the heater core in your Voyager to check if it is clogged. Locate two rubber hoses that connect to the heater core through the firewall area. Feel both the rubber lines going in and out of the heater core after the engine has warmed up. Both should be hot. If one is hot and the other is cold, you have a plugged heater core.
Flush the heater core
Before you consider replacing the heater core in your Voyager, it is recommended to flush the existing heater core. Flushing is done by pushing water through the outlet hose of the heater core and draining the gunk from the inlet hose. There are flush kits available in the market that can help you do the job yourself.
3. Bad thermostat
Thermostat is a part of the cooling system in Chrysler Voyager which ensures that the engine reaches its optimal operating temperature as quickly as possible and maintain it under all operating conditions.
Thermostat is stuck open
When you start your Voyager when the engine is cold, the thermostat cuts off flow of coolant through the radiator in order to quickly reach the optimal engine operating temperature. But if the thermostat has developed a defect and is stuck to open position, the coolant will continuously flow through the radiator and the engine may take a long time to reach its optimal operating temperature.
Heater takes a long time to blow hot air
Since the heating system in Voyager relies on the hot coolant from the engine to heat the interior, the heater will blow cold air until the engine reaches its normal operating temperature. But if the weather is too cold, the engine may never reach its optimal operating temperature with a stuck open thermostat. Your vehicle may also consume more fuel than normal.
5. Bad water pump
The water pump is the heart of the cooling system in Voyager responsible for pumping coolant throughout the system and cooling the engine. If the water pump has worn out and the coolant is not being circulated as effectively as it used to, it can cause the heater to stop working properly because there’s less coolant available to transfer heat between the engine and the heater core.
Water pumps usually last for more than 100,000 miles, but they can fail at any time. A bad water pump will not only cause poor heating, but can also result in engine damage due to overheating. Therefore it is important to diagnose a failing water pump at early stages to avoid expensive repairs later on.
6. Faulty blend door actuator
Blend door actuator plays a role in controlling the temperature inside your Voyager. If the blend door actuator fails to fully open the blend door towards the heater core, it will result in poor heating performance.
The most common symptom of a faulty blend door actuator in Chrysler Voyager is a slight clicking sound (or other unusual noise) repeatedly coming from under the dashboard. The sound will be most prominent for a few seconds when you turn on the air conditioning or adjust the temperature.
Symptom: knocking sound
A knocking noise from behind the dashboard could be an indicator of a bad blend door actuator in your Voyager. The sound is something like a light tapping on the door and it typically happens when you turn on/off the air conditioning system or start the engine.
Symptom: creaking sound
One side hot, other side cold.
A common symptom of a faulty blend door actuator in vehicles with dual zone climate control system is one side blowing hot air while the other side is blowing cold air.
Replace the faulty part
A bad blend door actuator usually cannot be repaired and must be replaced with a new one. Due to the complexity of the replacement job, it is not recommended as a DIY project. The blend door actuator may require recalibration after replacement.
7. Dirty cabin air filter
Dirty cabin air filter is the leading cause of weak heater airflow in Chrysler Voyager. The pollen filter, also known as the cabin air filter or microfilter, is responsible for filtering the air that the passengers breathe in the cabin. A dirty filter causes the overall ventilation of the interior to deteriorate resulting in reduced heating and airflow.

There is no fixed time for replacing the cabin air filter, but most manufacturers recommend a change after 10,000-20,000 miles. If you drive your vehicle in dusty or polluted environment, the filter can get dirty much sooner than manufacturer’s recommendation. Additionally, if you drive your Voyager with AC system set to fresh outside air most of the time, your cabin air filter will get dirty much sooner as compared to air recirculation mode.
Replace the filter at the start of every winter for optimal performance
It is generally recommended to replace the cabin air filter every year at the start of the winter season. Spring and summer seasons are hard on the cabin air filter because of pollen and bugs, and in the fall they can get clogged with leaf debris. This gives you a fresh start for the winter, improves defroster performance, and reduces chances of mold or mildew growth.
Can you clean a dirty cabin air filter?
Instead of changing the cabin air filter in Voyager, it is often recommended to first clean the filter. This can be done, for example, with a vacuum cleaner or a compressed air system, removing at least a large part of the visible dirt particles. Unfortunately, this procedure does not allow you to get into the deeper layers of the filter. Therefore, the filter performance will not increase significantly even after cleaning. As a rule, there is no avoiding a change if the filter is dirty.
8. Sluggish blower motor
If the blower motor in your Voyager is not spinning fast enough either due to an internal defect or due to a fault in the resistor/control module, the airflow from the AC vents will be weaker and the heating performance will be degraded.
When a blower motor goes bad, it usually makes unusual noises when in operation, and the passengers may feel reduced airflow from the air vents. Keep in mind that reduced airflow doesn’t always indicate a problem with the blower motor, as it can also happen due to a clogged cabin air filter, dirty evaporator, or a bad mode door actuator. So, all of them must be inspected when diagnosing poor airflow.
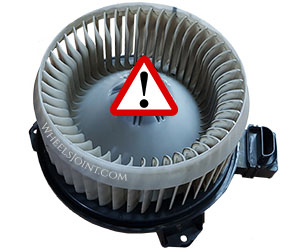
9. Dead blower motor (no airflow)
If there is no air flow from the air vents in the dashboard when you turn on the heater in your Chrysler Voyager, it means the problem is related to the fan or blower motor function.
The most common causes for blower motor not working in Chrysler Voyager are blown fuse, bad relay, resistor or control module malfunction, and faulty blower motor. However, a bad electrical connector or broken wire, or a defect in the climate control unit can also cause the blower motor to stop working.
10. Dirty evaporator
Dirty evaporator can cause weak airflow and reduce the heating performance in Voyager. Although, the evaporator coil is a component of the cooling function of the air-conditioning system, but the air always first passes through the evaporator and then flows over the heater core.
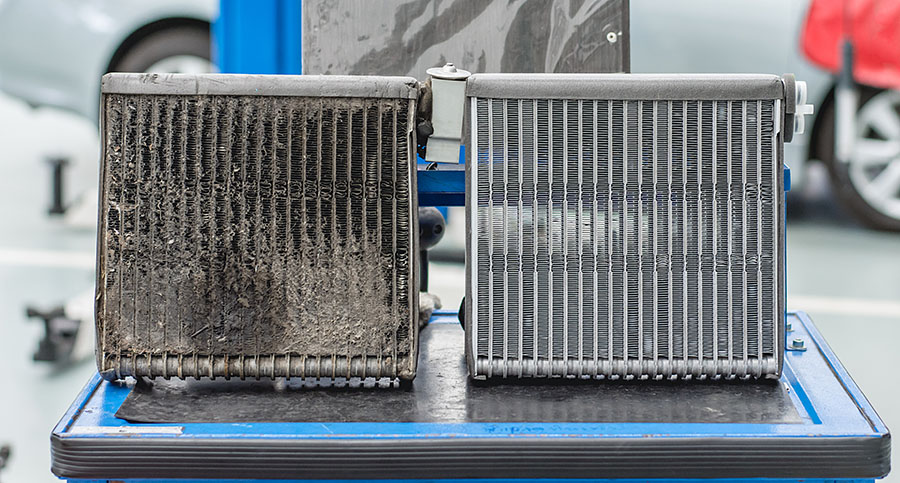
The cabin air filter captures most of the dirt or other airborne particles, but some particles escape and can get lodged on to the evaporator. Over time, these particles build up on the fins and block the air flow through the evaporator, causing reduced air flow in the cabin and poor heating or cooling.
Function of the evaporator in heating mode
When the heater is turned on and the AC turned off, the compressor does not turn on and the evaporator is not cooled. When you press the AC button in heating mode, the compressor turns on and the evaporator cools and dries the air before it enters the heater core. This mode is useful for clearing fog from the windows.
11. Faulty HVAC module
Climate control module is the brain of the air-conditioning system in your Chrysler Voyager, responsible for controlling all the components in the system. In rare cases, a fault in the climate control unit can cause the heater to stop functioning. This would require a scan tool to confirm correct operation.
12. Blown head gasket
The head gasket is responsible for providing the seal between the engine block and cylinder heads. Its purpose is to seal the combustion gases within the cylinders and to avoid coolant or engine oil leaking into the cylinders. Leaks in the head gasket can cause all sorts of problems in your Voyager including poor heater performance. This is mostly common in older vehicles.
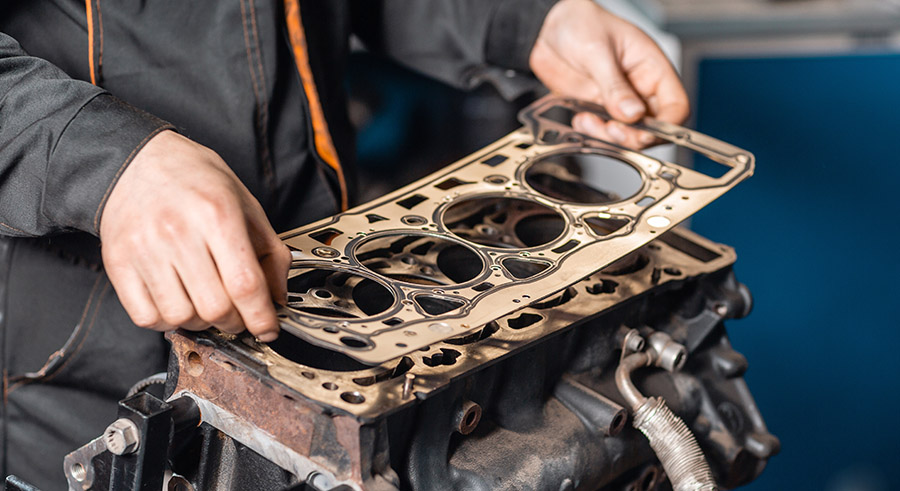
Leaking exhaust gases
A blown head gasket can cause the exhaust gases from the engine to enter the cooling system and plug the heater core. Clearing the air from the heater core will not help until the head gasket has been replaced.
Leaking coolant
A blown head gasket can cause coolant to leak into the combustion chambers and burn off. If your Voyager is losing coolant, that means there is a leak somewhere or it is getting burned up inside the engine.
How to check if head gasket is leaking in Voyager?
You don’t have to go to a workshop to check for a leaking head gasket in your Voyager. There are test kits available in the market in which you just have to insert a tube filled with colored liquid in the radiator (in place of the radiator cap), and then start the engine. If the liquid changes color, then there is a leak in head gasket.
Switch on air recirculation mode
When the outside temperature drops too low, the heating performance may be reduced in Voyager if the air conditioning system is set to outside air. To improve heating efficiency, it is recommended to switch on air recirculation mode. Don’t worry, there is no risk of suffocation, as the air recirculation mode still allows up to approximately 10 percent of the air coming from the air vents to be fresh air from the outside.

There are many reasons why the heater in your Chrysler Voyager is not working properly. When looking for the reason, you should start with the most obvious causes: low coolant level or air in the cooling system, and clogged heater core.
In any case, it is advisable for laypersons to visit a workshop. A professional mechanic can swiftly diagnose the heating issue for you.

- Rolls Royce Cullinan airbag light is on – causes and how to reset
- Mercedes-Benz A-Class dashboard lights flicker and won’t start – causes and how to fix it
- Fiat Panda heater not working – causes and diagnosis
- Genesis G80 steering wheel vibration causes and diagnosis
- Audi RS7 makes clicking noise and won’t start – causes and how to fix it
- Is Mitsubishi Pajero key fob waterproof?
- Jaguar F-TYPE door makes a squeaking noise when opening or closing
- GMC Sierra 3500 HD bad wheel speed sensor symptoms – how to diagnose
- Nissan Kicks windshield washer not working – causes and how to fix it
- Buick Enclave AC smells bad – causes and diagnosis
- BMW X1 ABS light is on – causes and how to reset
- Maserati Ghibli AC blower motor not working – causes and diagnosis
- Nissan Maxima windshield washer not working – causes and how to fix it
- Nissan Qashqai shakes at highway speeds – causes and how to fix it
- Mini AC not blowing hard enough – weak airflow causes
- Audi Q5 AC blowing hot air – causes and how to fix it
- Land Rover Discovery Sport steering wheel vibration causes and diagnosis
- Hyundai i10 AC not blowing hard enough – weak airflow causes
- How to reset oil light on 2005 Chevy Monte Carlo
- Mazda CX-3 battery light is on – causes and how to reset

- Chrysler Manuals
- Voyager 2001
- Operating information manual
Chrysler Voyager 2001 Operating Information Manual
- page of 168 Go / 168
Table of Contents
- Dear Customer
- Important Notice
- How to Use this Manual
- Warnings and Cautions
- Vehicle Identification Number
2 Things to Know before Starting Your Vehicle
- Ignition Key Removal
- Vehicles Equipped with Manual Transaxle
- Key-In-Ignition Reminder
- Replacement Keys
- Ignition Key Switch Light- if Equipped
- Illuminated Entry System - if Equipped
- If You Wish to Manually Lock the Steering Wheel
- To Release Steering Wheel Lock
- Manual Door Locks
- Power Door Locks
- Remote Keyless Entry - if Equipped
- To Unlock the Doors and Liftgate
- To Lock the Doors and Liftgate
- General Information
- Transmitter Battery Service
- Vehicle Security Alarm - if Equipped
- Central Door Locks
- Power Sliding Door - if Equipped
- Child Protection Door Lock
- Power Liftgate - if Equipped
- Power Vent Windows
- Power Windows
- Lap/Shoulder Belts
- Lap/Shoulder Belt Untwisting Procedure
- Seat Belt Pretensioners
- Seat Belts and Pregnant Women
- Driver and Front Passenger Supplemental Restraint System - Airbag
- Child Restraint
- Exhaust Gas
- Safety Checks You Should Make Inside the Vehicle
- Safety Checks You Should Make Outside the Vehicle
- Engine Break-In Recommendations
3 Understanding the Features of Your Vehicle
- Inside Day/Night Mirror
- Inside Automatic Dimming Mirror - if Equipped
- Power Fold Away Outside Mirrors - if Equipped
- Exterior Mirrors Folding Feature
- Outside Mirror - Driver's Side
- Outside Mirror - Passenger's Side
- Electric Remote-Control Mirrors
- Heated Remote Control Mirrors
- Illuminated Vanity Mirrors-If Equipped
- Manual Front Seat Adjuster
- Adjustable Head Restraints
- Power Seats - if Equipped
- Heated Seats - if Equipped
- Manual Reclining Seats (Front and Rear)
- Manual Lumbar - if Equipped
- Memory Seat - if Equipped
- Middle Quad Fold & Tumble™ Seating
- Middle Quad Fold & Tumble™ Seat Removal
- Rear Quad Fold & Tumble™ Rear Seat Removal
- Passenger Bench Seats
- Grocery Bag Retainer
- Rear-Most Bench Seat
- Rear Seat Descriptions
- Rear Bench Seating Flexibility
- Rear Quad Seating Flexibility
- Interior Lights
- Position Lights
- Lights-On Reminder
- Battery Protection
- Headlight Time Delay - if Equipped
- Front Fog Lights - if Equipped
- Rear Fog Lights
- Headlamp Leveling System
- To Open and Close the Hood
- Turn Signals
- Passing Light
- Windshield Wipers and Washers
- Headlight Washers-If Equipped
- Tilt Steering Column
- To Activate
- To Set at a Desired Speed
- To Deactivate
- To Resume Speed
- To Vary the Speed Setting
- To Accelerate for Passing
- Courtesy/Reading Lights
- Sunglasses Storage
- Compass/Temperature Display
- Mini-Trip Computer
- Vehicle Information Center - if Equipped
- Customer Programmable Features - if Equipped
- Electrical Outlet Use with Engine off
- Instrument Panel Cup Holders
- Convenience Tray and Smoker's Package Kit
- Rear Cup Holders
- Front Seat Storage bin - if Equipped
- Rear Compartment Storage Bins
4 Understanding Your Instrument Panel
- Instruments and Controls
- Instrument Cluster - Gasoline Engines
- Premium Instrument Cluster - Gasoline Engines
- Instrument Cluster - Diesel Engines
- Instrument Cluster Descriptions
- Power Button
- Front Blower Control
- Front Mode Control
- Dual Zone Control - if Equipped
- Diesel Cabin Heat Assist - if Equipped
- Second Seat Outlets - if Equipped
- Air Conditioning Operation
- Infrared Three-Zone Automatic Temperature Control - if Equipped
- Turn Signal Indicators
- High Beam Light
- Oil Pressure Warning Light
- Malfunction Indicator Light
- Vehicle Security Alarm (Immobilizer) Light - if Equipped
- Sound Systems
- Rear Wiper Switch
- Rear Washer Switch
- Electric Rear Window Defroster and Windshield Wiper De-Icer - if Equipped
5 Starting and Operating
- Normal Starting-Gasoline Engines
- Normal Starting-Diesel Engine
- Brake/Transmission Interlock System
- Automatic Transaxle Ignition Interlock System
- Four Speed Automatic Transaxle - if Equipped
- Manual Transaxle Recommended Shift Speeds
- All- Wheel Drive-If Equipped
- Parking Brake
- Anti-Lock Brake System - if Equipped
- Power Steering
- Tire Inflation Pressures
- Tire Pressures for High Speed Operation
- Radial-Ply Tires
- Compact Spare Tire
- Tire Chains
- Tire Rotation Recommendations
- Alignment and Balance
- Tread Wear Indicators
- Replacement Tires
- Traction Control-If Equipped
- Fuel Requirement - Diesel Engine
- Clean Air Gasoline
- Materials Added to Fuel
- Fuel Tank Filler Cap (Fuel Cap)
- Fuel Tank Capacity
- Warranty Requirements
- Trailer Hitch Attaching Points
- Overheating
- Vehicle Loading
6 What to Do in Emergencies
- Hazard Warning Flasher
- If Your Vehicle Overheats
- Jack Location
- Spare Tire Stowage
- Preparations
- Jacking Instructions
- Jump-Starting Procedures if Battery Is Low
- Acceleration
- Freeing a Stuck Vehicle
- With Ignition Key
- Without the Ignition Key
- TOWING this VEHICLE BEHIND ANOTHER VEHICLE (Flat Towing with All Four Wheels on the Ground)
- Towing this Vehicle Behind Another Vehicle with a Tow Dolly
7 Maintaining Your Vehicle
- 2.4L Engine
- 2.5L Diesel Engine
- 3.3L Engine
- Service and Maintenance Cautions
- Service and Maintenance Warnings
- Engine Oil Requirements - Gasoline Engines
- Engine Oil Requirements - Diesel Engines
- Drive Belts - Check Condition and Tension
- Spark Plugs
- Engine Air Cleaner Filter
- Fuel Filter - Gasoline Engines
- Fuel Filter Drain - Diesel Engine
- Catalytic Converter
- Battery Maintenance
- Air Conditioner
- Power Steering - Fluid Check
- Selection of Lubricating Grease
- Front Suspension Ball Joints
- Steering Shaft Seal
- Steering Linkage
- Drive Shaft Universal Joints
- Body Mechanism Lubrication
- Windshield Wiper Blades
- Windshield, Headlight Washers, and Rear Window Washers
- Exhaust System
- Cooling System
- Hoses and Vacuum/Vapor Harnesses
- Master Cylinder - ABS Brakes Brake Fluid Level Check
- Fuel System Hoses
- Automatic Transaxle
- Manual Transaxle
- All Wheel Drive (AWD) - if Equipped
- Front and Rear Wheel Bearings
- Appearance Care and Protection from Corrosion
- Cleaning the Instrument Panel and Underseat Cup Holders
- Onboard Diagnostic System (Obd)
- Replacement Parts
- Integrated Power Module (Ipm)
- Vehicle Storage
- Front Position Lights
- Front Turn Signal Lights
- Side Repeater Lights
- Front Fog Light
- Rear Tail, Stop, Turn Signal, Rear Fog, Side Marker and Back-Up Lights
- Center High Mounted Stop Light (CHMSL)
- License Light
- Replacement Light Bulbs
- Fluid Capacities
- Engine Specifications
- Vehicle Dimension, and Weight Specifications
- Maintenance Schedules
- If You Need Consumer Assistance
Advertisement
Quick Links
- Table of Contents 2
- 2 Things To Know Before Starting Your Vehicle 10
- 3 Understanding The Features Of Your Vehicle 40
- 4 Understanding Your Instrument Panel 70
- 5 Starting and Operating 92
- 6 What To Do In Emergencies 110
- 7 Maintaining Your Vehicle 120
Related Manuals for Chrysler Voyager 2001

Summary of Contents for Chrysler Voyager 2001
- Page 1 2 0 0 1 C H R Y S L E R V O Y A G E R O P E R A T I N G I N F O R M A T I O N...
Page 2: Table Of Contents
Page 4: introduction, page 5: dear customer, page 6: how to use this manual, page 8: warnings and cautions, page 10: things to know before starting your vehicle.
- Page 11 • Transmitter Battery Service ....17 • VEHICLE SECURITY ALARM — IF EQUIPPED ..18 • Central Door Locks .
Page 12: A Word About Your Keys
Page 13: vehicles equipped with manual transaxle, page 14: replacement keys, page 15: door locks, page 16: remote keyless entry - if equipped, page 17: to lock the doors and liftgate, page 18: general information, page 19: vehicle security alarm - if equipped, page 20: central door locks.
- Page 21 The power sliding door may be opened manually There are power sliding door switches located on NOTE: or by using the buttons on the remote keyless the trim panel just in front of the power sliding door • If anything obstructs the power sliding door entry transmitter, switches on the overhead con- for the rear seat passengers.
Page 22: Child Protection Door Lock
- Page 23 • There are also pinch sensors attached to the • If the power liftgate encounters multiple ob- Press and hold the button on the remote keyless entry transmitter for at least one second to open side of the liftgate opening. Light pressure structions within the same cycle the system the power liftgate, once the liftgate is fully open, anywhere along these strips will cause the...
Page 24: Windows
Page 25: occupant restraints.
- Page 26 Lap/Shoulder Belt Operating Instructions 3. When the belt is long enough to fit, insert the WARNING! latch plate into the buckle until you hear a “click”. 1. Enter the vehicle and close the door. Sit back • Wearing a seat belt incorrectly is dangerous. and adjust the seat.
- Page 27 4. Position the lap belt across your thighs, below WARNING! WARNING! your abdomen. To remove slack in the lap belt • A belt that is buckled into the wrong buckle • A lap belt worn too high can increase the risk portion, pull up on the shoulder belt.
Page 28: Lap/Shoulder Belt Untwisting Procedure
Page 29: seat belt pretensioners, page 30: driver and front passenger supplemental restraint system - airbag.
- Page 31 Airbags inflate in moderate to high speed im- Children more than 18 kg (40 lbs) should be WARNING! pacts. Along with seat belts and pretensioners, secured in the rear seat in child restraints or • Relying on the airbags alone could lead to front airbags work with the instrument panel knee belt-positioning booster seats.
- Page 32 • Instrument Panel • When the front airbag control module detects a The airbag control module also monitors the readiness of the electronic parts of the system collision requiring the front airbags, it signals • Seat Belt Readiness Light whenever the ignition switch is in the START or the inflator units.
- Page 33 • As the front airbags deflate you may see some If A Front Deployment Occurs Side Airbags Supplemental Restraint System The front airbag system is designed to deploy smoke-like particles. The particles are a normal (SRS) — If Equipped when the front airbag control module detects a by-product of the process that generates the The side airbag control modules determines if a moderate-to-severe frontal collision, to help re-...
- Page 34 • As the side airbags deflate you may see some If A Side Deployment Occurs after the vehicle has stopped moving, the interior The side airbag system is designed to deploy smoke-like particles. The particles are a normal lights will illuminate until the ignition switch is when the side airbag control module detects a by-product of the process that generates the turned off.
Page 35: Child Restraint
- Page 36 • When your child restraint is not in use, secure it The passenger seat belts are equipped with WARNING! cinching latch plates, which are designed to in the vehicle with the seat belt or remove it from • Improper installation can lead to failure of an keep the lap portion tight around the child the vehicle.
- Page 37 In addition, there are tether strap anchorages The 3-passenger bench seat in the third position WARNING! behind each rear seating position, located in the must be adjusted to the full rear position on the Do not install child restraint systems equipped rear surface of the seatback.
Page 38: Engine Break-In Recommendations
Page 39: safety checks you should make inside the vehicle, page 40: understanding the features of your vehicle.
- Page 41 • Middle Quad Fold & Tumble™ Seating ..48 • Middle Quad Fold & Tumble™ Seat Removal ..48 • Rear Quad Fold & Tumble™ Rear Seat Removal .
- Page 42 • TILT STEERING COLUMN ....57 • ELECTRONIC SPEED CONTROL ....58 •...
- Page 43 • Cargo Area Storage ..... 67 • ROOF LUGGAGE RACK—IF EQUIPPED ... 67 •...
Page 44: Mirrors
Page 45: exterior mirrors folding feature, page 46: seats, page 47: power seats - if equipped, page 48: memory seat - if equipped, page 49: middle quad fold & tumble™ seating, page 50: rear quad fold & tumble™ rear seat removal, page 51: passenger bench seats, page 52: rear seat descriptions.
- Page 53 1. Normal Seating— 3. Additional Storage— WARNING! The 2nd and 3rd row seats are installed. Both The 2nd row seats are installed in the middle • The cargo area in the rear of the vehicle seatbacks are in the upright position. seating position.
Page 54: To Open And Close The Hood
Page 55: headlights, page 56: headlight time delay - if equipped, page 57: multifunction control lever, page 58: headlight washers-if equipped, page 59: electronic speed control, page 60: overhead console, page 61: mini-trip computer.
- Page 62 Compass Variance Map...
Page 63: Customer Programmable Features - If Equipped
Page 64: electrical power outlets, page 65: electrical outlet use with engine off, page 66: storage.
- Page 67 To remove the console use the following proce- NOTE: WARNING! dure: When the removable floor console is located • Many accessories that can be plugged in between the middle seats, the power outlet 1. Open the rear lid and remove the storage tray. draw power from the vehicle’s battery, even only has power supplied to it when the ignition 2.
Page 68: Rear Compartment Storage Bins
- Page 69 LOAD LEVELING SYSTEM—IF CAUTION! WARNING! EQUIPPED To avoid damage to the roof rack and vehicle, do Cargo must be securely tied before driving your The automatic load leveling system will provide a not exceed the maximum roof rack load capacity vehicle.
Page 70: Understanding Your Instrument Panel
- Page 71 • Diesel Cabin Heat Assist — If Equipped ..81 • Second Seat Outlets — If Equipped ... 81 • Air Conditioning Operation .
Page 72: Instruments And Controls
Page 73: instrument cluster - gasoline engines, page 74: premium instrument cluster - gasoline engines, page 75: instrument cluster - diesel engines, page 76: instrument cluster descriptions.
- Page 77 9. Anti-Lock Light problem with the charging system. Immediate If the pointer rises to the “H” (hot mark) on a This light monitors the Anti-Lock Brake service should be obtained. vehicle equipped with a gasoline engine, pull System described elsewhere in this over and stop the vehicle.
- Page 78 • There is a Traction Control System malfunc- 20. Trip Odometer Button WARNING! tion Press this button to change the display from A hot engine cooling system is dangerous. You odometer to trip odometer. The word TRIP will • The system has been deactivated to prevent or others could be badly burned by steam or appear when in the trip odometer mode.
Page 79: Information Center
Page 80: power button.
- Page 81 Bi-Level Floor Air comes from both the instrument panel outlets, Air comes from the floor outlets. A slight amount of Air comes from the floor, defrost and side window floor outlets and defrost. air is directed through the defrost and side win- demist outlets.
Page 82: Dual Zone Control - If Equipped
Page 83: air conditioning operation.
- Page 84 • Start the engine, and continue to hold in the 2. You can disable this feature permanently by fer to section 7, Maintenance Procedures, of this “POWER” button until the indicator light starts following the procedure below: manual for proper coolant selection. flashing repeatedly.
Page 85: Infrared Three-Zone Automatic Temperature Control - If Equipped
- Page 86 There is a manual blower range used when the NOTE: Floor “AUTO” setting is not desired. The left control The front wiper defrost symbol will knob can be set to any fixed blower speed by show in the display screen when in rotating the knob from “LO”...
- Page 87 Bi-Level Panel When the outside air contains smoke, odors, high humidity, or if rapid cooling is desired you may wish to recirculate interior air by pressing the recirculation button. The recirculation mode should only be used temporarily. The “A/C” and recirculate symbols will illuminate in the display when these buttons are selected.
- Page 88 This feature may be disabled using the following The center knob on the front ATC control unit has Floor procedure: three positions, “REAR CONTROL”, “OFF”, and Air comes from the floor outlets. “AUTO”. Only when the front control switch is in •...
Page 89: Rear Window Features
Page 90: electric rear window defroster and windshield wiper de-icer - if equipped, page 92: starting and operating.
- Page 93 • Compact Spare Tire ....• Tire Chains ......•...
Page 94: Starting Procedures
Page 95: normal starting-diesel engine, page 96: automatic transaxle ignition interlock system, page 97: manual transaxle, page 98: all- wheel drive-if equipped, page 99: power steering, page 100: anti-lock brake system - if equipped, page 101: traction control-if equipped, page 102: tire inflation pressures, page 103: tire chains, page 104: alignment and balance, page 105: fuel requirements, page 106: adding fuel, page 107: fuel tank capacity, page 108: trailer hitch attaching points, page 109: overheating, page 110: what to do in emergencies, page 111: hazard warning flasher, page 112: jacking and tire changing, page 113: preparations, page 114: jump-starting procedures if battery is low.
- Page 115 Before jump starting, check the battery electrolyte 1. Wear eye protection and remove any metal WARNING! level on vehicles equipped with gasoline engines. jewelry such as watch bands or bracelets that Do not connect the cable to the negative post of This can be done by removing the caps on the top might make an inadvertent electrical contact.
Page 116: Driving On Slippery Surfaces
Page 117: with ignition key, page 118: without the ignition key, page 120: maintaining your vehicle.
- Page 121 • Power Steering — Fluid Check ... . . • Selection of Lubricating Grease ... . . • Front Suspension Ball Joints .
- Page 122 • REPLACEMENT LIGHT BULBS ....• BULB REPLACEMENT ....•...
Page 123: 2.4L Engine
Page 124: 2.5l diesel engine, page 125: 3.3l engine, page 126: service information, page 127: onboard diagnostic system (obd).
- Page 128 Engine Oil Filter Selection — All Engines under all types of operating conditions, select only All Chrysler International engines have a full-flow engine oils that meet American Petroleum Institute type oil filter. Use a filter of this type for replace- (API) certification and SAE viscosity standards or ment.
Page 129: Engine Oil Requirements - Diesel Engines
Page 130: fuel filter - gasoline engines, page 131: battery maintenance, page 132: air conditioner, page 133: power steering - fluid check, page 134: front suspension ball joints, page 135: windshield wiper blades, page 136: exhaust system.
- Page 137 Cooling System — Drain, Flush and Refill solution. The use of lower quality water will reduce CAUTION! At the intervals shown in the maintenance sched- the amount of corrosion protection in the engine Mixing of coolants other than specified (non- ules, the system should be drained, flushed and cooling system.
- Page 138 • If frequent coolant additions are required, or if Disposal of Used Engine Coolant Coolant Level — Diesel Engine Used ethylene glycol based engine coolant is a Check level in the coolant recovery bottle when the level in the coolant recovery bottle does not regulated substance requiring proper disposal.
Page 139: Hoses And Vacuum/Vapor Harnesses
Page 140: master cylinder - abs brakes brake fluid level check.
- Page 141 Selection of Lubricant NOTE: Wipe the area around the dipstick clean to elimi- It is important that the proper lubricant is used in nate the possibility of dirt entering the transaxle. Whenever the fluid is checked, especially on the transaxle. Mopar Automatic Transmission fluid vehicles operated under conditions of severe 5.
Page 142: Manual Transaxle
Page 143: front and rear wheel bearings.
- Page 144 • If you detect any stone chips or scratches in the • If a lot of driving is done on gravel roads, CAUTION! paint, touch them up immediately. The cost of consider mud or stone shields behind each Do not use abrasive or strong cleaning materials such repairs is considered the responsibility of wheel.
Page 145: Cleaning The Instrument Panel And Underseat Cup Holders
Page 146: integrated power module (ipm), page 147: replacement light bulbs, page 148: front position lights, page 149: front fog light, page 150: center high mounted stop light (chmsl), page 151: general specifications, page 152: vehicle dimension, and weight specifications, page 154: maintenance schedules.
- Page 155 MAINTENANCE SCHEDULES This is especially important for engine oil and filter The service intervals are based on your odometer changes. reading in thousands of kilometers. For kilometer You will find the scheduled maintenance service intervals beyond that listed, you should continue for your vehicle, along with the operations to be •...
- Page 156 At Each Stop for Fuel At Each Oil Change • Check the engine oil level about 5 minutes after • Change the engine oil filter. a fully warmed engine is shut off. Checking the • Inspect the exhaust system. oil level while the vehicle is on level ground will •...
Page 158: If You Need Consumer Assistance
- Page 159 IF YOU NEED ASSISTANCE AUSTRIA FRANCE Chrysler International distributors are vitally inter- TNT MAILFAST TNT MAILFAST ested in your satisfaction with their products and C/O Chrysler Austria C/O Chrysler France services. If a servicing problem or other difficulty BRU/BRU/37850 BRU/BRU/37850...
- Page 160 GRAND DUCHY OF LUXEMBOURG ITALY TNT MAILFAST TNT MAILFAST C/O DaimlerChrysler Belgium/Luxemburg C/O Chrysler Italy BRU/BRU/37850 BRU/BRU/37850 Antwoord Nummer 1930–32 CASELLA POSTALE 29 1930 Zaventem 20092 CINISELLO BALSAMO Tel.: 0800 6661 Tel.: 06/41 89 88 12 Fax: 32 2 713 82 70...
Page 162: Index
- Page 163 Adding Fuel ....105 Battery ..... 130 Adding Coolant (Antifreeze) .
- Page 164 Electronic Speed Control ... 58 Filler Cap ....105 Hood Release ....53 Engine Compartment .
- Page 165 Liftgate ..... 21 Seat Belt Reminder ... . . 76 Rearview .
- Page 166 Power Steering, Checking ..132 Adjustable Upper Shoulder Anchorage . . 27 Specifications ....150 Power And Pregnant Women .
- Page 167 Tread Wear Indicators ... 103 Tread Wear Indicators ... . 103 Warnings and Cautions ... . . 7 Towing .
- Page 168 81-426-10013 Printed in Europe...
Rename the bookmark
Delete bookmark, delete from my manuals, upload manual.
Fuse box diagram

Fuses and Relay Chrysler Voyager 2001-2007
For Chrysler Voyager 2001, 2002, 2003, 2004, 2005, 2006, 2007 model year.
Chrysler Grand Voyager.
Fuse box in passenger compartment.
fuse box diagram.
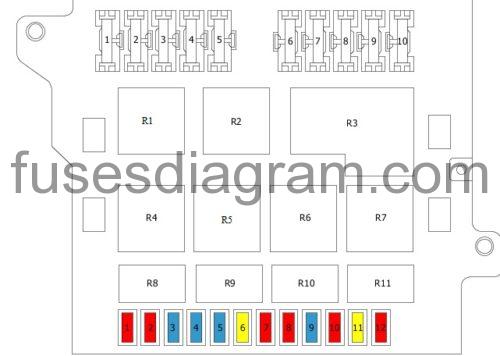
Assignment of the fuses
Fuse box in engine comparment.
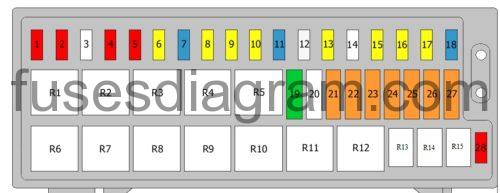
Fuse 1 Airbag control unit 10.0 A Fuse 2 Airbag control unit 10.0 A Fuse 3 Spare fuse Fuse 4 Left main beam Left headlights 10.0 A Fuse 5 Right main beam Right headlights 10.0 A Fuse 6 Fog light relay Left dipped beam 20.0 A Fuse 7 Right dipped beam Right headlights 15.0 A Fuse 8 Cigarette lighter 20.0 A Fuse 9 Horn Horn relay 20.0 A Fuse 10 Fuse box in passenger compartment 20.0 A Fuse 11 Air-conditioning compressor clutch relay 15.0 A Fuse 12 ABS control unit 25.0 A Fuse 13 Brake light switch 20.0 A Fuse 14 Spare fuse/relay Fuse 15 Transmission control relay 20.0 A Fuse 16 Fuel pump relay Powertrain control unit (PCM) 20.0 A Fuse 17 Automatic shutdown relay 20.0 A Fuse 18 Electric mirrors Fuse box in passenger compartment 15.0 A Fuse 19 Wiper relay 30.0 A Fuse 20 Not used Fuse 21 Front blower motor relay 40.0 A Fuse 22 Parking light relay 40.0 A Fuse 23 Ignition switch Starter motor relay 40.0 A Fuse 24 Cooling fan 1 relay Cooling fan 2 relay 40.0 A Fuse 25 ABS control unit 40.0 A Fuse 26 Central locking Fuse box in passenger compartment 40.0 A Fuse 27 Heated rear windscreen Fuse box in passenger compartment 40.0 A Fuse 28 Memory seats Electric mirror module Fuse box in passenger compartment 10.0 A Relay R1 Cigarette lighter relay Accessory socket Relay R2 Wiper high/low relay Relay R3 Wiper relay Relay R4 Main beam relay Relay R5 Dipped beam relay Relay R6 Spare relay Relay R7 Horn relay Relay R8 Air-conditioning compressor clutch relay Relay R9 Spare relay Relay R10 Front blower motor relay Relay R11 Starter relay Relay R12 Parking light relay Relay R13 Transmission control relay Relay R14 Fuel pump relay Additional relay, fuel pump Relay R15 Automatic shutdown relay
Chrysler Voyager (2008 – 2020) – fuse box diagram
Year of production: 2008, 2009, 2010, 2011, 2012, 2013, 2014, 2015, 2016, 2017, 2018, 2019, 2020
Engine compartment fuse box

WARNING: Terminal and harness assignments for individual connectors will vary depending on vehicle equipment level, model, and market.
- Remember me Not recommended on shared computers
Forgot your password?
- Voyager 4th Generation (2001-2007)

Asked by Stevec0268 , December 5, 2016
- Answer this question
- Ask a question
Morning all, hope someone can help with this nigly little problem.
On these cold mornings the Aux Heater on 2005 2.8 Diesel comes on as it should. Now I can't tell any difference in the speed in which the engine or interior egts up to temp compared to when the heater doesn't come on (i.e. when the fuel level is below a quarter tank). Also I can be driving for at least an hour on motorways and it doesn't turn off. The temp guage is sitting just below half way so no problems with the thermostat. The only way it will turn off is if I get the car up to temperature, pull over and stop the engine and then re-start and it doesn't come back on.
Don't know if this is a common thing or anyone has come across it before, if so is there a way to make it turn off when up to temp?
Any help greatly recieved.
Link to comment
Share on other sites, 12 answers to this question.
- Sort by votes
- Sort by date
Recommended Posts
I've got pretty much the same. It was minus something or other this morning & although the aux heater indicated it was on it didn't seem to make much difference.
To turn it off just lower both temps a few degrees then set them back to normal.
Yes with the temperatures getting colder it's staying on a lot longer, on my morning run in this morning (2oC) it didn't cut out at all, temperature was just under half way mark and I had climate control set to 22oC.
You could add the 'winterise' kit to the front, i.e. blocking part of the radiator up, as these engines are cold runners and by blocking part of the radiator front it helps retain the warmth. I've just done that to mine using QinteQ's technique of using pipe insulation (the foam stuff in long tubes). Just cut it to size and push it into the gaps, it looks decent and helps it get to temperature faster.
Having said that, it should still be getting warm after a short drive with aux heater on, I get 'delay' on mine for approx 3 minutes on a very cold morning, when it turns on the temp gauge has moved to just around the first mark and warm air starts to come out the blowers so it starts warming at that point.

Why is 'not turning off' a problem ? It's a fully automated Webasto ThermoTopo. It's job is to protect the engine in very cold weather by assisting the engine's ability to get up to a working temperature more quickly. It's not a cabin heater as most think, costs virtually nothing to run and indeed saves money by reducing those first 20 more expensive minutes and metal wear when the big metal engines moving parts are not yet up to working temp.
I have to say in all my years this is the first ever time I've seen anyone wanting it turned off, normally people are begging for anyone to supply & fit second hand used parts for £200. Do as Andy suggests and 'winterise' your GV. Best of luck.
Why is 'not turning off' a problem ? It's a fully automated Webasto ThermoTopo. It's job is to protect the engine in very cold weather by assisting the engine's ability to get up to a working temperature more quickly. It's not a cabin heater as most think, costs virtually nothing to run and indeed saves money by reducing those first 20 more expensive minutes and metal wear when the big metal engines moving parts are not yet up to working temp. I have to say in all my years this is the first ever time I've seen anyone wanting it turned off, normally people are begging for anyone to supply & fit second hand used parts for £200. Do as Andy suggests and 'winterise' your GV. Best of luck.
Just assumed it should turn off as never had a car with one before.
Thank you everyopne for their comments, you have put my mind to rest!
Hi QinteQ, Just assumed it should turn off as never had a car with one before. Thank you everyopne for their comments, you have put my mind to rest! Steve
Its an expensive 'friend', an additional after-market extra people pay a lot for. Left to its own devices it will just work if (1) its cold enough and (1) if you are at least 1/4 full of fuel. If you really want it switched off get underneath the car and unplug the electrical connector near the unit, denied a power supply voltage it will go dead along with its brain. We all have to learn including me, all questions and answers are knowledge and that's why we use forums. Take care !
http://i.ebayimg.com/images/g/QswAAOSwImRYER-t/s-l1600.jpg
Webasto....Any kind of filtering system?... Work fine and as should. However I have fumes, first thought maybe manifold etc etc then noticed only when the aux heater kicks on in cold weather. Not noticeable when moving [obvious reasons]
Webasto....Any kind of filtering system?... Work fine and as should. However I have fumes, first thought maybe manifold etc etc then noticed only when the aux heater kicks on in cold weather. Not noticeable when moving [obvious reasons] Tks
Standstill window open lights or inside garage you will, it exhausts driver's door @ sill level. Any other suggests flexi pipe issue. Standard stuff but never bought a length. Yanks use both 5kW thermo and water top, try rockauto uk or any UK supplier of Flexi.
Thanks for that
Having it up on ramp next week [my local mot spot] to have sill repair and handbrake adjustment, good time to deal with this too.
Thanks for that Having it up on ramp next week [my local mot spot] to have sill repair and handbrake adjustment, good time to deal with this too.
.1. early issues with understanding 'top.hat brakes' years ago including PIC of small parts: https://www.chryslerforum.com/forum/chrysler-voyager-town-country-21/my-struggles-gv-handbrake-mot-22210/page2/
.2. a good YUK is mentioned this means engine running, level ground, brake fluid topped up, STAMP hard on foot bake and keep pressure on, then pull up hard 6 times to balance Y cable + clockspring assembly. If that's no good you need small parts/lotsa time/copperslip grease. Then YUK process again.
Best of luck.
Can I be lazy and ask location of the Webasto rather than crawl around....[maybe flexi prob...white smoke under bonnet..and fumes in cab, but only first start if aux is engaged otherwise not]

Join the conversation
You can post now and register later. If you have an account, sign in now to post with your account.

× Pasted as rich text. Paste as plain text instead
Only 75 emoji are allowed.
× Your link has been automatically embedded. Display as a link instead
× Your previous content has been restored. Clear editor
× You cannot paste images directly. Upload or insert images from URL.
- Submit Reply
- Existing user? Sign In
- Online Users
- Leaderboard
- All Activity
- Create New...
heater CHRYSLER VOYAGER 2022 Owners Manual
Page 6 of 316.

Page 29 of 316

Page 45 of 316

Page 66 of 316

Page 67 of 316

Page 109 of 316

Page 110 of 316

Page 197 of 316

Page 237 of 316

Page 239 of 316

- Load next 10 pages
CHRYSLER Owners Manuals
- 2010 CHRYSLER SEBRING CONVERTIBLE 3.G Owners Manual
- 2013 CHRYSLER 300 SRT 2.G Owners Manual
- 2023 CHRYSLER PACIFICA HYBRID Owners Manual
- 2000 CHRYSLER CARAVAN Owners Manual
- 2005 CHRYSLER VOYAGER Owners Manual
- 2015 CHRYSLER 300 2.G Owners Manual
- 2015 CHRYSLER 200 2.G Owners Manual
- 2011 CHRYSLER TOWN AND COUNTRY 5.G Owners Manual
- 2010 CHRYSLER 300 C 1.G Owners Manual
- 2007 CHRYSLER 300 C 1.G Owners Manual
- 2003 CHRYSLER VOYAGER Owners Manual
- 2011 CHRYSLER 200 CONVERTIBLE 1.G Owners Manual
View, print and download for free: heater - CHRYSLER VOYAGER 2022 Owners Manual, 316 Pages, PDF Size: 17.41 MB. Search in CHRYSLER VOYAGER 2022 Owners Manual online. CarManualsOnline.info is the largest online database of car user manuals. CHRYSLER VOYAGER 2022 Owners Manual PDF Download. 4 STARTING AND OPERATING STARTING THE ENGINE ....................................... 104 Normal Starting ............................................. 104 Aut
All product names, logos, and brands are property of their respective owners.
Privacy Policy | About Us & Contact
- Скидки дня
- Справка и помощь
- Адрес доставки Идет загрузка... Ошибка: повторите попытку ОК
- Продажи
- Список отслеживания Развернуть список отслеживаемых товаров Идет загрузка... Войдите в систему , чтобы просмотреть свои сведения о пользователе
- Краткий обзор
- Недавно просмотренные
- Ставки/предложения
- Список отслеживания
- История покупок
- Купить опять
- Объявления о товарах
- Сохраненные запросы поиска
- Сохраненные продавцы
- Сообщения
- Развернуть корзину Идет загрузка... Произошла ошибка. Чтобы узнать подробнее, посмотрите корзину.
Oops! Looks like we're having trouble connecting to our server.
Refresh your browser window to try again.
We're sorry for any inconvenience, but the site is currently unavailable.
IMAGES
VIDEO
COMMENTS
1. 20. Front Fog Lamp Relay, Front Control Module. 2. 15. except Export: Left Front Park/Turn Signal Lamp, License Lamp, Trailer Tow Connector, Left Rear Lamp Assembly, Front Control Module. 15. Export: Left Park Lamp, Left Headlamp Leveling Motor, License Lamp, Left Rear Lamp Assembly, Front Control Module. 3.
Hopefully it'll be the filter assembly in which case it needs replacing. I'd not be 100% that its the fuel heater causing your cut-out/non-running, as if the heater has fused/got damaged in the filter assembly it normally means the casing is cracked/damaged and will be leaking air, causing air in the fuel lines.
The heater may stop working in Chrysler Voyager due to low coolant level or air in the cooling system, clogged heater core, bad thermostat, faulty blend door actuator, bad water pump, dirty cabin air filter, bad blower motor, or HVAC control unit malfunction. 1. Low coolant or air in the cooling system. Low coolant level or air in the cooling ...
Gasoline: Fuel Pump Relay, Powertrain Control Module, Fuel Tank Module: 20: Diesel: Fuel Heater Relay, Fuel Heater, Crank Case Heater: 17: 20: Gasoline: Automatic Shut Down Relay (Powertrain Control Module, Downstream Heated Oxygen Sensor, Upstream Heated Oxygen Sensor, Generator, Ignition Coil, Fuel Injector) 25
View and Download Chrysler Voyager 2001 operating information manual online. Voyager 2001 automobile pdf manual download. ... each front seat occupant can independently control the tem- It is recommended to operate the heater after perature of air coming from the outlets on their refueling in early fall to assure a good quality fuel side of the ...
Cigarette lighter fuse. Assignment of the fuses and relay Chrysler Voyager 2001-2007. Fuse and relay location. Fuse box diagram. Cigarette lighter fuse. Assignment of the fuses and relay Chrysler Voyager 2001-2007 ... Air-conditioning heater control Rear wiper motor: fuse 7: 10A: Electric mirrors: fuse 8: 10A: Speaker relay ... Fuel pump relay ...
Air Conditioners & Heater. Body - Sheet Metal Except Doors. Brakes. Cooling. Doors, Door Mirrors And Related Parts. Electrical. Engine. Exhaust. Fuel. Interior Trim. Steering. Suspension & Drive. Transmission. Wiper & Lock Cylinder And Keys. Home > Chrysler > Voyager > Fuel. Popular Chrysler Voyager Fuel Parts See More > Fuel Level Sensor. Gas ...
19 gal. Transmission. 9-Speed Automatic. 9-Speed Automatic. Drivetrain. FWD. FWD. Shop OEM 2020 Chrysler Voyager Parts at wholesale prices. You will find everything you need in this complete online parts catalog for 2020 Chrysler Voyager.
Rear Blower. R10. Automatic Shut Down (ASD) R11. Radiator Fan Low. WARNING: Terminal and harness assignments for individual connectors will vary depending on vehicle equipment level, model, and market. Chrysler, Voyager electricity. Chrysler Voyager (2008 - 2020) - fuse box diagram.
Diagram of fuse boxes and relays - Chrysler Voyager, Town & Country. Applies to vehicles manufactured in the years: ... Diesel: Fuel heater relay (crankcase ventilation heater, fuel heater) 18: 15: A / C Compressor Clutch Relay, Power Mirror Switch, Adjustable Pedal Relay (Except for Export), Passenger Folding Mirror Relay (Export), Ignition ...
Chrysler Grand Voyager. The most common reasons a Chrysler Grand Voyager heater isn't working are a broken heater blower motor, a problem with the thermostat, or a failed heater blower motor resistor. 0%. 31 % of the time it's the. Heater Blower Motor.
I've knocked the fuel heater flexi exhaust hose and it dissentigrated. Does anyone know what size it is or how to replace? I'd like to think it's standard hose. ... Chrysler Voyager / Grand Voyager ; Voyager 4th Generation (2001-2007) Fuel Heater 0; Fuel Heater. Asked by 3ddesign, April 4, 2018. Share
Chrysler Voyager / Grand Voyager ; Voyager 4th Generation (2001-2007) Aux Heater 0; Aux Heater. Asked by Stevec0268, December 5, 2016. Share ... Now I can't tell any difference in the speed in which the engine or interior egts up to temp compared to when the heater doesn't come on (i.e. when the fuel level is below a quarter tank).
Chrysler voyager fuel heater fuse keeps blowing. Fuel heater fuse keeps blowing after starting the car chrysler voyager 2004 Posted by Anonymous on Jun 12, 2013. Want Answer 0. Clicking this will make more experts see the question and we will remind you when it gets answered. Comment; Flag; More.
View, print and download for free: heater - CHRYSLER VOYAGER 2022 Owners Manual, 316 Pages, PDF Size: 17.41 MB. Search in CHRYSLER VOYAGER 2022 Owners Manual online. CarManualsOnline.info is the largest online database of car user manuals. ... Search: (fuel pump, child restraint, fuel pressure, check engine, child lock, engine oil) Page 6 of 316
Chrysler voyager 2.8 diesel 54 plate 2004 central locking stopped working after research i changed the fuel heater fuse solving the central locking issue after starting the car i checked the fuse again to find it had blown please help arghhhhhhhh.
Lighter fuse - Engine compartment fuse box (from 1996 onwards) - Fuse No. 8/20A. Lighter fuse - Engine compartment fuse box 2000 - Fuse №4/20A. Engine compartment fuse box 1995-1999. Fuse box diagram. Fuse Assignment (1997). Passenger compartment fuse box, fuse 7. Door Lock Relay.
1. MSRP: $8.55. $5.89. Add To Cart. Genuine Mopar Parts, the Right Choice. MoparPartsGiant.com offers the wholesale prices for genuine 2001 Chrysler Voyager parts. Parts like Fuel Tank are shipped directly from authorized Mopar dealers and backed by the manufacturer's warranty. Parts fit for the following vehicle options.
Find many great new & used options and get the best deals for Heater Blower Motor Resistor for Dodge Grand Caravan 2001-2007 Chrysler Voyager at the best online prices at eBay! Free shipping for many products!
Search from 20 Used Chrysler Voyager cars for sale, including a 2020 Chrysler Voyager Lxi, a 2021 Chrysler Voyager Lxi, and a 2022 Chrysler Voyager LX ranging in price from $15,218 to $26,490. ... Fuel Type. Fuel Economy. Exterior Color. Interior Color. Transmission. Engine Displacement. Vehicle History . At Home Services. Video Walkaround (11) ...
Test drive Used 2023 Chrysler Voyager at home in Saint Petersburg, FL.Used Chrysler Voyager car for sale.